
Recently we were learning to activate the Developer tab in Excel, but today we are going to take one more step to learn how to create a macro in the program, a very interesting option to automate tasks.
Article Content
What is a macro
Macro is the abbreviation for macro instructionand it's just a instruction series that are memorized and assigned to a specific control that allows us to perform a achievement of actions quickly and easily.
For example, a simple option that will allow us to understand the macro function It would be if, for example, we have to color certain boxes with a certain frequency, while changing the color of the letter.
Performing this action a couple of times may not require much effort, but what if you have to carry out the task hundreds of times?... things get complicated.
For this reason, we are going to learn to create a button through which, by simply pressing it, we will carry out this action on the square or group of squares chosen.
But to avoid getting confused, we are going to go directly to the practical case.
Steps to create a macro with Excel
Well, let's get to work. We open Excel and, in case we don't have it, it is interesting activate the Developer tab as we already explained in the previous article. I remind you of the path: File / Options / Customize Ribbon.
Create a button to associate the macro
Okay, now let's create a button that we will assign the macro. We can do this before or after creating said macro, as we like.
For this we enter Programmer and click on Insert. From the list that is displayed we choose, for example, the rectangle that appears in Form controls.

Next, we click on any area of the document and a window like this will appear. Since we haven't created the macro yet, we have nothing to assign, so we cancel and continue.

Now we will see the button already created. If we click on it we can move it, resize it, change its name, and even format it so that it has a less bland appearance. We have left it as is (we will learn how to make these modifications a little later) and we have entered the name of your favorite technology page.

Create a macro in Excel
Now we can move on to create the macro, and to do this we select any box in the document, we return to the Developer tab and click on the button “Record macro” (we can also click on the icon at the bottom, but today we are not going to get involved).

Now, all the actions we carry out will be memorized in the macro, so we have to be careful and go step by step. In our case, what we will do is color the box dark red and put the text white.
When you press the Record Macro button, a window like the following appears:

We have to give a name to the macro (they cannot be used spaces ni signs), we can choose a key combination for activate the macro (instead of assigning it to the button), choose where we want to save the macro and add a description.
by accepting recording will start, and in our case we will only go to the Home tab, select the dark red color and the white text color. Now we click on the little square that we will see in the Excel bottom bar with which the recording will end (we can also finish from the Developer tab).
To reset everything, we remove the color from the cell that has been colored again and select the black text.
Assign a macro
To finish we will only have to click with the Right mouse button on the button that we created at the beginning and click on assign macro. Now we select the macro and accept.

Let's head to the box B2 (for example) and we write any text:

Now we select said box and press the button:
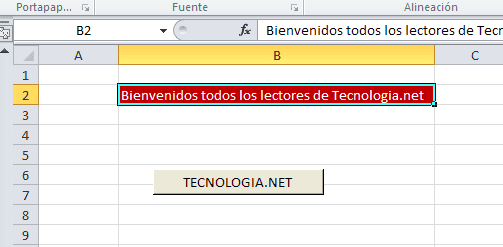
And voila, we're done. We can also select multiple boxes and perform the action at the same time. If you have questions or problems, do not hesitate to ask whatever you need.
Industrial Engineering student and lover of writing and technology, for several years I have participated in various pages with the aim of always keeping myself informed of the latest trends and contributing my grain of sand in this immense dissemination network that we know as the Internet.
 – Access to Wi-Fi settings")


