
In this brief tutorial we are going to explain to you how you can make images weigh less, either because you want to take up less space on the hard drive or directly because you need to send them to someone and obviously our goal is to make them as light as possible so as not to have problems during the process. Whatever your reason, we are going to give you a series of tips that we are convinced will help you have much less burdensome images.
Before starting, I would like you to read this article, in which we present the new fashion in the US of denouncing all bloggers who take images on copyrighted websites.
Article Content
Choose a suitable type of format
As many of you can already imagine, today we can choose between a wide variety of image formats, which are presented with a series of characteristics that define them and make them, depending on the use to which the image is intended, some more interesting than others.
In our case, the objective is to achieve send an image losing the minimum quality but getting it to weigh the minimum possible, and for this we are going to focus on three main formats: GIF, JPEG and PNG.
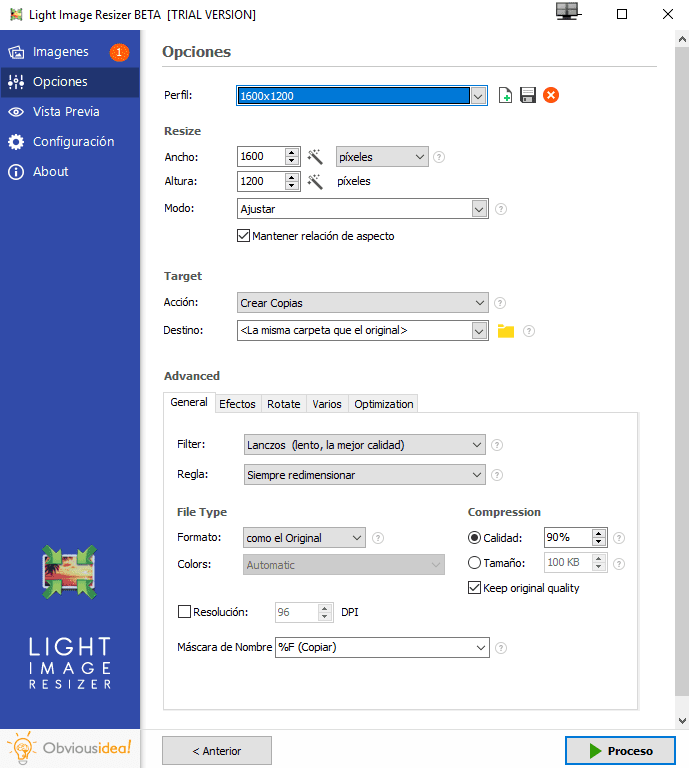
Obviously, in order to change image format We are going to need a specialized program. In our case, a short time ago we were analyzing the so-called Light Image Resizer, one of the most interesting alternatives that will allow us to choose between these three formats that we are going to talk about below as well as many others.
Features of the GIF format
We start with the GIF image format, a widely used alternative that you will surely know thanks to the fact that it also allows you to save animations.
It is undoubtedly a very valid option, but it should be noted that we are talking about a format that has perhaps become somewhat outdated, not just because it has had a lot of time behind it, but because This standard is limited to a maximum number of colors, which are 256 for each image., which can mean that, although the image itself practically does not lose quality after compression, this reduction in colors can create an appearance that is not as beautiful as we would like.
In short, if they are images with few colors, the GIF format may be interesting, but if it is an image in which we want to preserve the colors as well as the quality, we may be interested in either of the two formats that we are going to use. talk next.
Features of the JPEG format
This is perhaps one of the most used formats when it comes to compress images to send by email, upload to web pages, etc.
The reason is because it is perhaps the format that will allow us greater compression, that is, the JPEG format will be the most suitable for those who want compress an image as much as possible, making it weigh as little as possible, but be careful, since in this case we are going to lose a little image quality.
It should be noted that this format works phenomenally well in the case of images that have many colors and gradients. An example of this type of image would be when we capture a landscape or take photos with our friends on the beach, in the mountains, etc.
If we are going to send a normal and ordinary image so that other people such as our family, friends, co-workers, etc. can see it, this format is going to be very helpful, but if the objective is to ensure that the maximum quality of the image is respected, image, the most interesting alternative will be the PNG format.
Characteristics of the PNG format
Third, we have the PNG format which we could basically understand as the new GIF format, and also It is compatible with animations and we will hardly lose image quality, but in this case We are not going to be limited by the palette of 256 maximum colors. Of course, we must also keep in mind that with this format we will be able to maintain the quality and colors to the maximum, but we are not going to achieve compression or make the image weigh as if we would do it with the JPEG format.
An important detail of the PNG format is that it is especially indicated for those images that do not have excessive gradients and do not appear too many angular shapes. An example of this type of image would be when we photograph a textbook, when we take screenshots, etc.
In summary, If we want the minimum weight we will use the JPEG formatIf we want maximum quality and colors at the expense of greater compression, the ideal will be the PNG format, and if we are looking for a middle ground that allows us greater compression but with the limitation of 256 colors, the alternative of the GIF format is what We are looking for.
Choose the right size for the image
Once we have made a decision regarding the image format we want to use, the next thing will be to reduce its size.
Currently, both digital cameras and those found in mobile phones allow us quite high resolutions, which means that we can, for example, print a large image without fear of losing quality, but as in our case we are not going to To initially make prints or, if we do, with a smaller dimension we would have enough, what we will do is choose a size that allows us to see the image with a sufficient dimension but thus achieving that it weighs considerably less.
Basically, an image will weigh more the larger it is, regardless of the file format we have chosen.
In the same way that we use the Light Image Resizer program to change the image format, it will also be useful to change the dimension of the image, and all this in the same process, thus achieving that, in just a few seconds , any image is perfectly prepared to be sent by email or stored taking up the minimum possible space. In addition, we can also modify several images at the same time, so ideal for large jobs.
Of course, we should not overdo it when compressing the image, since with this process there is also the risk of losing a little quality, but it is clear that in most cases we are going to send images that do not require as many characteristics and quality, so the usual thing is to opt for a JPEG type format and a dimension of, for example, 640 × 480 px, so that we can get an image that weighs several megabytes to become just a few kilobytes.
Tools to reduce the weight of images
Tiny JPG
It is a free app where you will only have to select the image you want to optimize and they will do the rest, the only limitation is that the free version only allows you to optimize images with up to 5 tables of weight.
Buy JPG
The website will select up to 20 images from your files to optimize, it is a very complete option and also accepts formats such as PNG.
Photoshop
It is a tool that allows you to do a thousand things, but this time we are going to show you what you have to do:
- Enter the image you want to optimize.
- Select the “files” option from the menu above.
- Once the menu has been displayed, select the “export for web” option
- What this mode allows you to do is lower the resolution to the maximum.
Industrial Engineering student and lover of writing and technology, for several years I have participated in various pages with the aim of always keeping myself informed of the latest trends and contributing my grain of sand in this immense dissemination network that we know as the Internet.
 – Access to Wi-Fi settings")


