
Even though we live in the age of optical fiber, there are still many people who are looking ways to speed up internet. As much as broadband Internet plans have options to contract 50, 100 or 300 MB, the truth is that there are still those who have many problems when using their Internet connection. All without counting those people who still cannot access fiber optics and continue to use the copper pair, which offers 20 MB or lower speeds.
Anyone can suffer from slow internet, regardless of the connection they have contracted. They could already be viruses on the computer, a poor configuration of the tools used and a long etcetera. For this reason, it is important to know all the tricks to speed up the internet.
Article Content
First things first: take a speed test
Before starting to apply any method to speed up the internet connection, the first thing we have to do is try to know where the problem comes from. Are we receiving all the megabytes? It could be a problem on the part of the ISP (the company from which you contract your broadband, for example Movistar), limits on your equipment's hardware or many other reasons.
For a speed test All you have to do is go to a website that allows you to measure the speed of your network connection. When performing the test, you must take into account that open programs can affect the result. Because of this, it is important to close all open programs to obtain results that are more in line with reality.
1. Choose a suitable browser and optimize it
If your internet problems only occur when browsing the web, maybe all you have to do is choose a different web browser or optimize the one you already have.

All browsers have their pros and cons (and we already talked about some of the better alternatives to traditional browsers in the past), but generally have relatively similar performance. The important thing is to optimize them so that they work smoothly.
Remove unnecessary extensions and plug-ins
There are certainly a large number of extensions and plug-ins that are very useful. But is it worth having them installed if they are practically not used? Extensions are there to be able to automatically do something that we could do manually. If we barely use these tools, perhaps it is worth eliminating them so as not to sacrifice performance, or deactivating them when they are not used.
Many people tend to collect extensions, which causes it to slow down the browser a lot, even when they are disabled. Delete all extensions and keep only the essential ones. If we review we can see that we really only need a couple of them.
To eliminate them, simply access the browser settings and look for the “Extensions”, “Add-ons” or “Plug-ins” tab, depending on the browser. When you hover over one of the tools to be deleted, you will see a trash can that you have to click on to delete it.
Disable cookies

All browsers store 'cookies'. The famous cookies serve to offer better functioning of some services, not only to track our interests to offer us 'advertising according to our tastes'. However, in many cases they are not necessary.
Deactivate cookies It will allow us to eliminate part of the information that is loaded from the websites, making navigation lighter. Although it is true that we will give up some things, such as maintaining a session started on a website, for example (when the tab is closed, the session will be closed as there is no cookie that indicates that the website has been accessed with a username and password. .
Go to Settings (or Configuration) > Advanced > Privacy and Security > Content settings > Cookies. There we will have to uncheck the “Allow sites to save and read cookie data” box. The route may vary from one browser to another. We can always use the search engine within the browser settings to find the option.
Clear cache, browsing history and downloads
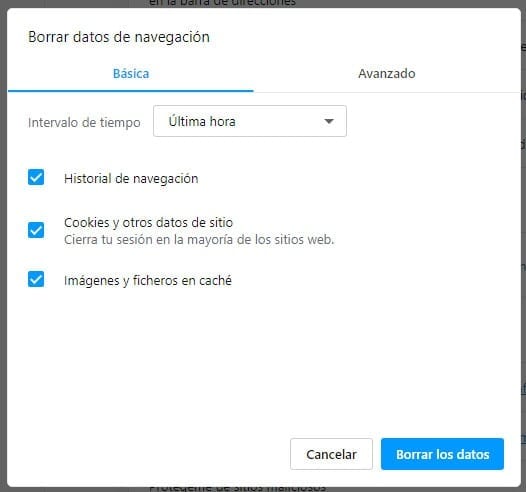
There are people who have never cleared their browser cache. This means that there may be gigabytes and gigabytes of information stored that are always available to the browser, but will never be useful to the user again. What this does is simply slow down the use of the browser.
All of this information can be removed to improve performance. To do this you simply have to access Settings > Advanced > Privacy and security > Clear browsing data. In this tab we can mark the time interval for which we want to delete the information (an hour, a day, week, month or forever) and we can mark if we want to delete the browsing history, cookies, and cache.
2. Slow WiFi? Change the channel and frequency of the WiFi network
Is only the WiFi connection slow? If the broadband works correctly but the WiFi connection is very slow, the problem may be that there are many people connected to networks on the same channel or frequency.
This problem is especially common in cities or blocks with many routers. All we have to do is change the channel of the WiFi network. To do this we will have to access the router through the address 192.168.1.1.
Within the router configuration we will have to look for the WiFi network tab (choose the 2.4 GHz or the 5 GHz network). Inside we will have to look for the option ““Channel Selection” or “Channel selection”. It will normally be placed in CAR. We will have to try the different channels available. There are routers that do not reach certain channels, so choosing the highest channels can be a good starting point.
3. Change DNS
There are times when Domain Name Servers They may be very saturated or not the right fit for us, especially if they were already on the team or he automatically chooses them.
Manually we can change DNS on the computer to look for a server that is faster (and that can also offer us better features, as we already saw in the best DNS of 2019).
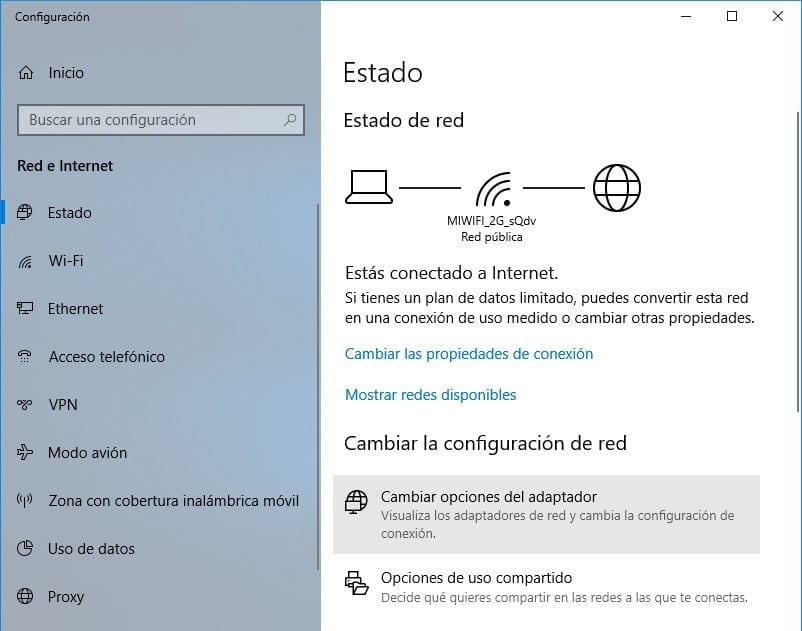
In order to make the change, we will have to Go to Control Panel > Network and Internet > Network and Sharing Center and click on our Internet connection (if we are connected by cable, click on “Ethernet”). A new window will open with the connection parameters, there we will have to press the button "Properties" and look, in the new window, for the option Internet Protocol version 4 (TCP / IPv4) or TCP/IPv6 if version 6 is used. We will click on it and then on “Properties”. In the last window we will mark the option “Use the following DNS server addresses” and we will write the address we want to use. A good option is Google: 1.1.1.1
4 Remove bandwidth limit
There are times when Windows itself may be limiting internet connection. It can be really useful on certain occasions, however it is important to eliminate any limit that the computer is putting on the connection in case our access to the network is slow. The limit that we will eliminate is the one that is reserved for certain Windows functions.

In order to eliminate the limit (or set it to zero) we will have to access the local group policy editor. We will enter it using the Run… tool of Windows.
- We will press Windows + R and we will write Gpedit.msc
- The Local Group Policy Editor window will open. We'll have to navigate to Computer Configuration > Administrative Templates > Network > QoS Packet Scheduler > Limit Reservable Bandwidth
- In the new window we will have to check if the mode appears as Not configured.
- We will mark the Enabled option and write 0 as the bandwidth limit, so it will be unlimited.
We will apply the changes in the policy editor and restart the computer for the changes to take effect on the computer.
5. Clear the DNS cache
Browsers aren't the only ones that cache information. All “temporary” files that serve to facilitate access to certain information are stored on the computer, and can be found in many tools and system features.
Domain name servers (DNS) also store information. Flushing the cache can be a simple but effective way to release load on the connection to make it run smoothly, i.e. a good way to speed up internet in the team.
The process is really simple:
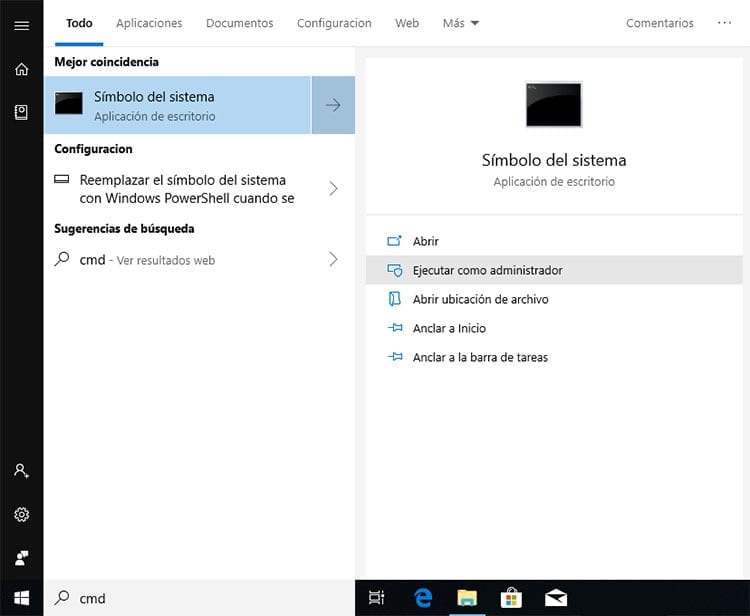
- We will open the Start menu and type CMD
- We will right click on “Command Prompt” and run it as administrator
- Inside the command console we will write “ipconfig /flushdns” (without the quotes) and press Enter.
In just a few seconds you will see a message in the command window indicating that the DNS cache has been successfully cleared. Now you can check if you have really made a significant change in the connection speed.
6. Disable 'receive window auto adjustment'
Many people, especially on Windows 10, are having problems with a system feature called level of automatic reception window adjustment. This option is enabled by default in the Microsoft operating system, and unfortunately it has undergone changes in several updates that cause it to cause problems. This feature can be disabled, and is all that is needed to speed up internet in windows 10.
In order to deactivate the automatic adjustment level, you must go to the Start menu and type CMD in the search box. In the result, you have to right-click on “Command Prompt” and select “Run as administrator” to open a command console with elevated permissions. We must accept the system warning message.
Inside the terminal we will have to write the following command: netsh interface tcp show global
This command will be responsible for displaying the TCP connection information. We will look in the different parameters for the line that indicates “Reception window automatic adjustment level”. If the value returned is “normal” it will mean that the feature is enabled.
To deactivate this parameter, just write in the command console ”netsh int tcp set global autotuninglever=disabled” (without the quotes). We will restart the computer and check that we have an internet connection and that it has improved its performance.
In the event that the problem has not been solved, or has gotten worse, we can enable the feature again by typing, in the terminal, netsh int tcp set global autotuning = normal.

I have been glued to a monitor since a PC fell into my hands in 1997. Now I like to write about everything related to them.
Content writer. Graphic Designer and Search Engine Optimization


