
If you are interested in developing applications for Android, or if you just want to run a diagnosis of your terminal at home, you need to be able to connect your smartphone or tablet to your computer. However, this requires you to configure it properly and enable USB debugging mode on the phone.
Combined with a computer running a diagnostic program, such as the Android SDK for example, debug mode can allow access to all kinds of useful information about your device, such as monitoring RAM and other functions for advanced users and developers, such as installing a custom ROM to have complete control of your device.
Below I am going to explain step by step how to activate USB debugging mode on an Android device.
Activate debug mode on Android 4.0 or higher
If you still don't have a terminal with Ice Cream Sandwich or a higher version of Android, allow me to give you some advice: change your device, either by updating the system or replacing it with another one with a more updated version. After this note, I continue with the explanation to activate debugging mode:
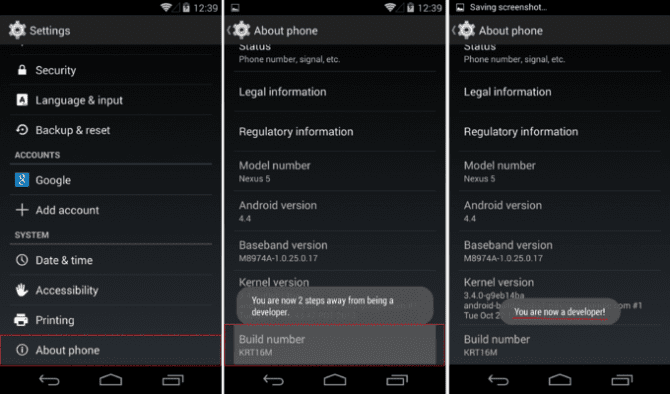
- Access the terminal's application launcher and go to Settings – Developer Options. If you cannot find this option, which is at the bottom of the menu, you will need to access it using an “Easter egg” that some versions of Android have:
- Look for the About phone – Build number option in the menu and click on the box several times. When you are about to unlock the secret option, the system will notify you, and will do the same when you already have it available. Once activated, you can proceed to activation.
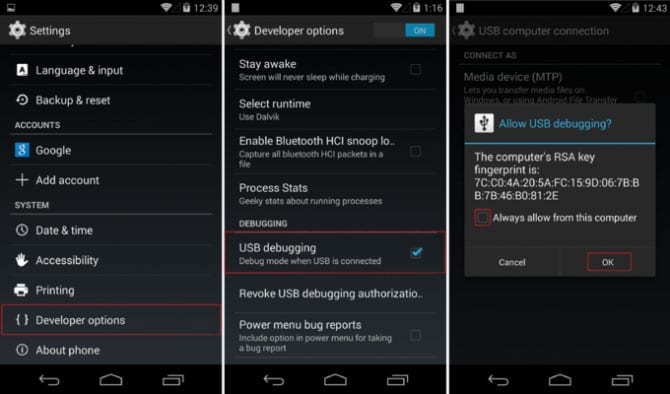
- Go to Developer Options and check the USB Debugging box. After that, you now have the option enabled to connect to a computer and have full access to the terminal.
Enable debugging for older versions
If you love your device very much and don't want to change it for anything in the world, there is still hope. You can activate USB debugging to connect it to a computer from which to access the diagnostics.
- When you access the launcher menu, instead of finding the configuration option directly you need to enter from Applications – Development.
- Go in and find the USB Debugging checkbox and check it. You already have it activated.
At that moment you will have an alert in the notification bar indicating that debugging is connected. From that moment you have access to all the options that application developers use to check the operation and resources of your terminal.
When we connect the phone to the computer, a message will appear asking if we want to allow debugging. To avoid having to always repeat this process, all we have to do is check the option to always allow it. This way we will access it again whenever we want automatically.
What if I don't want to always have debug mode activated?
It is very simple. The only thing you have to do when you finish connecting it to the computer is repeat the same steps again and uncheck the box. You can turn it on and off as many times as you want.
Keep in mind that transferring files, such as images or songs, does not require debugging enabled. You can access these folders whenever you need without having access to advanced features. You can also use an external card and transfer files whenever you want from one place to another simply by changing the card from one device to where you want to leave them.
As you can see for yourself, turning on debugging to fully access your phone is not an engineering issue, nor a hacker thing. It is very simple.
Of course, it is worth keeping in mind that with this you access the heart of the machine, something that you would only have to do when you really know what you are doing. You don't have to be a developer, but when you make any important adjustments make sure you save a backup copy of all the data in case you touch where you shouldn't.
Inveterate technophile. I write about technology, science, productivity and general culture.
 – Access to Wi-Fi settings")


