
Android is the most used mobile operating system in the world. Google has managed to offer users a system that allows them not only to enjoy great stability but also to have a large number of customization options.
Users Android They can install all kinds of modifications on the device. The most popular ones are generally easy to install and do not require any knowledge to use them. However, other more complete options that touch the system in greater depth require special permissions.
In order to install and use these tools, it is necessary to have superuser permissions. These are the permissions that only the administrator obtains, and which in Android are known as root.
Article Content
What is root on Android?
The word root, like practically all words in the world of technology, comes from English and means “root.” Basically it indicates that you have access to the root of the device, where all the important information is housed. This is a widely used term. Being a root user on UNIX-based systems, such as Android or Mac OS, means that you have access to the root directory, in short, you have full access to the system.
Another way to call this 'total control' of the system is Super user, a term used mainly on Android, and which is equivalent to being the administrator on Windows computers.
While an ordinary user is not able to delete or modify certain elements on Android, such as the bloatware (pre-installed applications that some devices arrive with). Root an Android mobile opens the doors to everything imaginable for the device and the operating system.
What can you do with a rooted mobile? From changing the official version of Android for pre-cooked ROMs to being able to add modules with incredible functions thanks to projects like the Xposed Framework.
Advantages and disadvantages of rooting a mobile
As with everything, rooting an Android has a lot of advantages, but also its drawbacks. The main advantages focus on being able to do practically whatever you want with the operating system, both in terms of functions and visual customization.
Among the disadvantages is basically that It is possible to brick the phone if you are not careful where they put their hands. It is very important not to touch what we do not know what it is or what it is for. Deleting or modifying a critical file could cause the system to stop working, and in the worst case scenario, end up with a paperweight.
To the disadvantages we must add the fact that it can be void the warranty Of the device. For this reason, it must be emphasized that each user must do so at their own risk. If the mobile is no longer under warranty, this will not be a problem.
How to root Android
Although the traditional form is the most widespread for root Android, there are interesting alternatives that are focused on users who have less experience in the matter. However, errors may occur or access to administrator permissions may not be completed, so you will have to carry out the process again or find an alternative.
Basically you can find the traditional method, using the necessary files, downloaded from the internet, or with third-party tools such as Kingroot.
How to root with KingRoot for Android

Kingroot It is a unique tool. Completely free software, of Chinese origin, specially designed for newbies in the field who want to experience the benefits of enjoying full access to the device, but without having to get their hands dirty by downloading tools to unlock bootloaders, recoveries, applications and more.
With just one click you can get root the mobile. Something that has caught the attention of many users. This is why KingRoot has achieved overwhelming popularity, although It is not compatible with all terminals.
In order to get the Super user If it is an Android device, using this tool you have to follow some very simple steps:
- Connect your mobile via USB to the computer on which the tool is installed.
- After it recognizes the model, click on Root
- Wait for the process to complete
In this simple way, and with a waiting time that can last up to a few minutes, the rooting of the terminal will have been completed. The SuperSU application will be installed and you will have administrator permissions to be able to reach where we did not have access before.
Removing root with this tool is just as simple. Simply open the KingRoot app on the device on which it has been installed and click on Uninstall tool. In the same way, you will have to access SuperSU and eliminate root from there and, later, uninstall the app if you prefer.
Using the tool is really simple. It is compatible with more than 100.000 different models, although there are still enough to make it compatible with all the devices that have seen the light of day on the market. If you can't get your superuser permissions you will have to try the other method.
How to root Android manually
Although the 'traditional' method of gaining access to the root of the device, and therefore freedom in the system, may be the most complicated but without a doubt the most effective. You rarely have to worry about the rooting process not being successful.
Although it may seem very complicated for novices, the truth is that it is as simple as downloading a few ZIP files and installing them in a 'special' section of the terminal. This section can only be accessed by pressing certain keys on the phone when turning it on, perhaps one of the most complicated parts of the process, since it varies depending on the terminal, although it is nothing mysterious.
Unlock the bootloader
The first step root an android mobile It involves undoing the blockage of the program that loads the operating system and checking that everything is correct with the hardware, that is, it is necessary unlock bootloader.
For some time now, on mobile phones you can find a feature in their settings that allows you to unlock the bootloader with a single click. Just go to Settings > Developer Options > OEM Unlock. If you do not see the “Development Options” tab, you will have to scroll to “About Phone” and repeatedly click on “Build Number”. After a few taps on the screen, a message will appear indicating that these options have been enabled.
Thanks to this feature, the process is significantly facilitated. If it is not available, it will be necessary to unlock this system boot through the methods offered by each manufacturer. All you have to do is access the official website and search for information on the same site to continue with the process.
Install a custom recovery
In order to enjoy root access to the terminal, it is necessary to install the software SuperSU on the device. Although it can be downloaded like any app, sometimes this method does not work, so it is necessary to directly install the software before the device starts. To achieve this it is necessary to install a custom recovery.
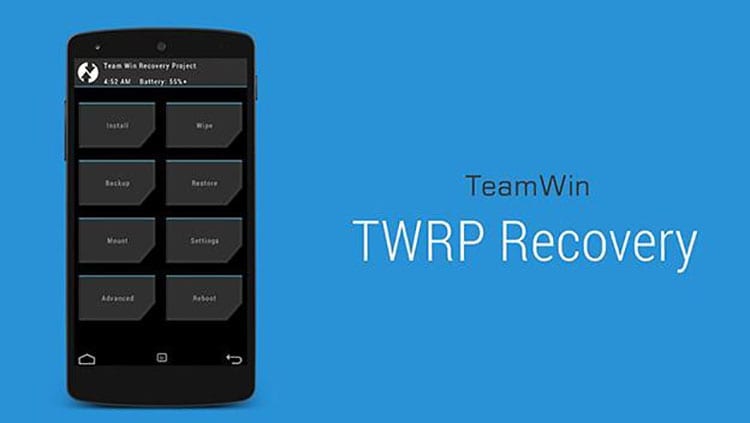
There are different recoveries, TWRP is one of the most popular and offers many interesting features when accessing it. The installation of 'Team Win Recovery Project' is very simple. All you have to do is download the official app from the Google Play app store.
With the application installed on the terminal, just open it and click on TWRP FLASH, select the device from the list and click on Download TWRP. After a bit of waiting, the software will have been installed on the terminal.
Install SuperSU
In order to finish the process it is necessary download SuperSU and install the application on the device. Instead of downloading from the Play Store, it will be done from its official website, through this link. You must scroll to the ZIP section to download the compressed file that will be installed through TWRP.
After you have downloaded the ZIP file you need to move it to the root of the device. To do this, you must connect the terminal to a computer through the USB port and move the file directly to the root, never to a system subfolder. This way it will be easy to find it in the recovery.
The next step is reboot the device and access recovery. To achieve this you have to press a certain combination of buttons on the device. Generally the combination is the power button + volume down. By holding down both buttons for a few seconds you can see the device turn on with the TWRP screen.
Within the recovery you have to scroll and click on the button install, choose the SuperSU ZIP file and slide the switch to proceed with the installation. After a few seconds you will see a message that it has been installed correctly.
After restarting the device and accessing Android normally you will be able to see how the SuperSU app is installed in the terminal. Now the rooting will be complete and you will be able to access all the interesting functions that this feature offers on Android terminals.

I have been glued to a monitor since a PC fell into my hands in 1997. Now I like to write about everything related to them.
Content writer. Graphic Designer and Search Engine Optimization

 – Access to Wi-Fi settings")

