
Next we will explain how to configure consumption in Windows 10, a section that we must all know if we want balance performance and electrical expenditure from our PC.

Electrical consumption configuration possibilities
Whether we are talking about a desktop computer and more especially a laptop, configuring consumption in Windows 10 is important to avoid spending more than necessary. On the one hand we will improve autonomy if we operate through batteries, and on the other we must also take into account that many times we consume more electricity than we need to perform the same task, which is obviously not necessary at all.
For this reason, we are going to find three possibilities when configuring consumption in Windows 10:
- Saver: with this option we will reduce the consumption of our computer as much as possible, although it is obviously important to keep in mind that performance will also decrease. However, we will avoid consuming a large amount of electrical energy, which represents a greater autonomy and a bill reduction at the end of the month.
- Balanced: By default, this is the option that is activated on our PC when we install Windows 10. It is undoubtedly one of the most interesting options and in fact it is the recommended one, since it is responsible for Automatically balance performance and electrical energy consumption, which means that when it can save electricity it will do so, but when we ask for greater performance from our computer it will have no problems increasing consumption.
- High performance: perhaps it would be the least recommended option although it can be interesting especially for those who have a slow or somewhat old PC, since what we will be indicating is that we want it to be in any case performance over consumption.
Steps to configure consumption in Windows 10
To configure consumption in Windows 10, the first thing we will do is click on the Start button (how nice to be able to say that again) and then click on “Settings”.
In the window that appears, we click on “System” and then select the “Start/shutdown and sleep” option. This will open a new section on the right side of the window where we will see the “Additional energy configuration” link. We click on it and we will find ourselves in the main window to configure consumption in Windows 10.
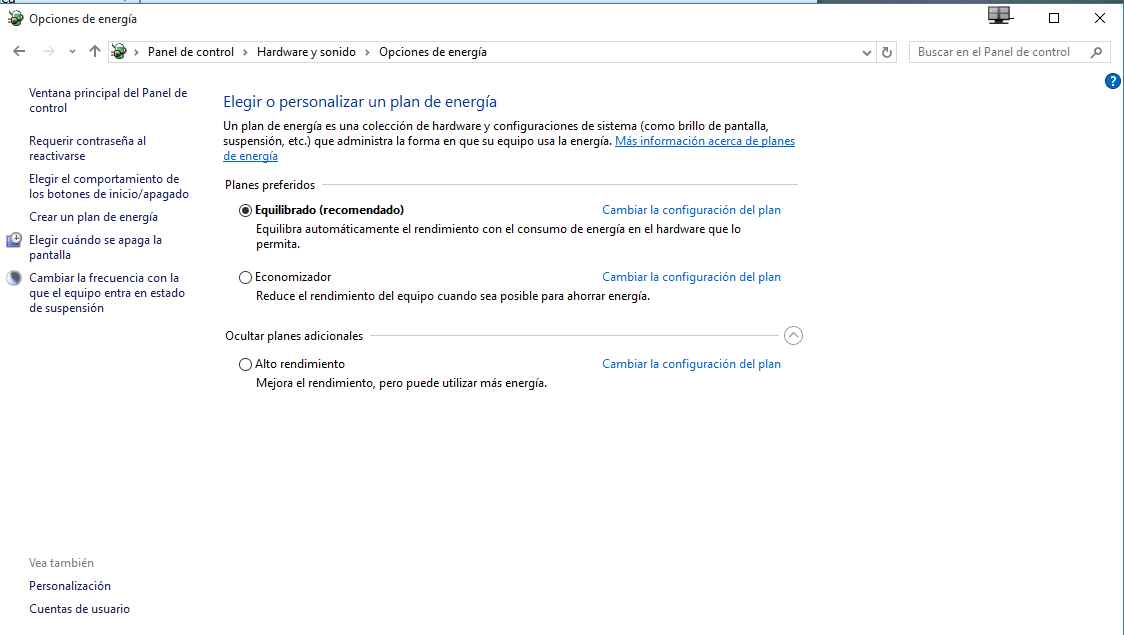
Here we will see the two main plans that are the balanced and the economizer that we have been talking about previously. As we told you, we have a third high-performance plan, which we can see by clicking on the small arrow that appears right at the bottom.
Once we have chosen the plan that interests us most, on the right we will see the link “Change plan settings where we can choose if we want the screen to turn off or even have the device go to sleep. That is, we can configure the time until these two actions take place automatically.
At the same time, you will also see here the link “Change advanced power settings” where you can access a wide range of options such as choosing the hard drive shutdown time, as well as many other actions that will help you increase performance or reduce the electrical consumption.
Industrial Engineering student and lover of writing and technology, for several years I have participated in various pages with the aim of always keeping myself informed of the latest trends and contributing my grain of sand in this immense dissemination network that we know as the Internet.
 – Access to Wi-Fi settings")


