
You have probably found yourself, on more than one occasion, in a situation in which you want to show something on your screen to someone but that person is not present to be able to show it to them. What can you do then? The best is take a screenshot so I can save it and show it to you later.
But how do you take a screenshot? It is important to know that taking an “image” of a device screen varies depending on which terminal we are talking about. Taking a screenshot from a computer is not the same as taking a screenshot from a mobile phone, in the same way that the screen is not captured in the same way on a Mac as on Windows.
This time we are going to see how to take a screenshot in windows 10, the latest version of Windows that Microsoft has launched on the market. If you have an older version of Windows, don't worry, almost all the methods we show on this occasion are equally valid for versions such as Windows 8 or 8.1, Windows 7 and earlier.
Article Content
How to take a screenshot in Windows 10
In order to take a screenshot in Windows 10, we will first have to identify what we want to capture, and how we want to do it. There are different possible methods to capture the screen that work differently, and have different possibilities.
Snipping tool
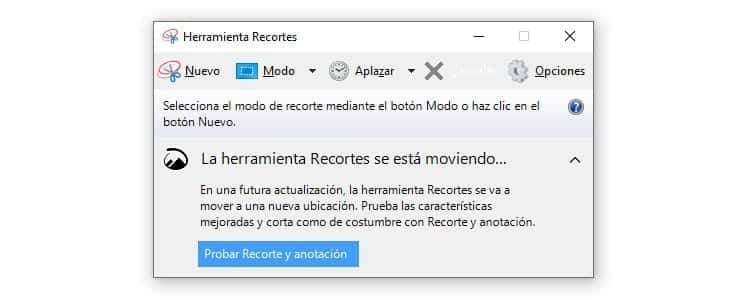
Since Windows Vista there is the snipping tool. This is a feature that not many people have paid attention to but is perfect for the task of taking screen images.
This tool allows you to take screenshots any way you want. For example, by clicking on the “Mode” tab you can choose rectangular, free-form captures, capture a window or the entire screen.
Once the mode is selected, you just have to click on “New” to be able to select the area of the screen to capture if necessary. After doing so, a new window will appear with the image and different tools to write and underline, as well as draw on the image. In case you want to undo something you've already done, just use the eraser in the toolbar.
When you have finished editing the image, click on the floppy disk to save the image wherever you want. It also offers options to copy the image or email the clipping.
Snip & Sketch
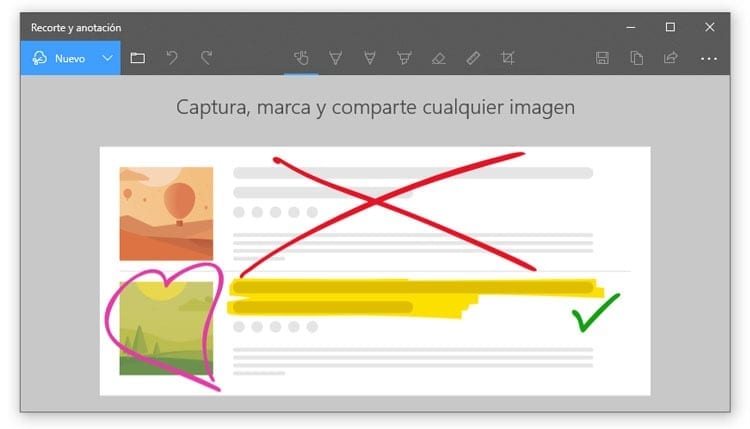
The snipping tool is very useful but it is also true that it is too simple. Microsoft knows this and that is why they have launched an improved version in the latest versions of Windows 10 known as Snip & Sketch.
This tool works in the same way as the snipping tool. You can capture sections of the screen, the entire screen, or use the freeform tool to create a crop. The news is found in the edition area.
Snip & Sketck (Snipping and Annotations in Spanish) has a few more tools, plus a renewed look. It allows you to modify the color of the pencil and marker, as well as its thickness, in addition to having a marker to underline things. To this we must add the ruler and the protractor that can now be found among the available tools.
To access this function, momentarily, you must open the snipping tool and click on the blue “Test cropping and annotation” button, at the bottom of the message that indicates that “the snipping tool is moving.”
Capture screen with keyboard
Print screen key
Do you want exactly what you see on your monitor to be “photographed”? So with the keyboard you can do it easily. All you have to do is press the key "Print Screen".
All keyboards designed for Windows have this key. It is located between the “F12” key and “Scroll Lock”, in the upper right area of the keyboard. The key may be abbreviated as “Print Screen” or “Prnt Scrn” if the keyboard is in English.

When you press the key, a screenshot will be created and saved to the Windows clipboard. This clipboard image can be pasted into a Skype conversation, for example, or passed to an image editing program for later editing and storage. Despite what many say, it is not necessary to press the “Alt” key for the capture to take place.
Using this method, despite being incredibly simple and useful, does not allow the image to be stored on the computer. It only serves to take the capture and place it on the Windows clipboard, available to paste in practically any software.
Windows Key + Print Screen
To take a screenshot in Windows 10 and save it to the PC, you will have to press the “Windows” + “Print Screen” key combination. By pressing both keys you can see how, momentarily, the screen becomes a little darker indicating that the capture has been made.
To see the captures made just go to Images > Screenshots. All images captured with this key combination are stored there.
Windows key + Shift + S
Do you want to use Snip & Sketch to capture screen? Windows 10 has a keyboard shortcut to directly launch the application on the PC. The screen will blur and you will be able to see the Snip & Sketch menu in the upper area of the monitor. There you can choose the way in which you want to take the capture.
It might interest you: How to remove the start screen in Windows 10
Windows Logo + Volume Down
Not only computers use Windows 10 as an operating system. Many high-end tablets use Microsoft's operating system, in addition to the Surface tablets developed by the company itself.
As a mobile device, it does not have the same keys as a computer. For this reason, screenshots are taken in a slightly different way than on a computer. On this occasion you have to press the Windows logo along with the volume down button. In this way you can take the screenshot in Windows 10 on the Tablet.
As on the PC, all images taken in this way will automatically be saved in the folder Images > Screenshots, unlike what happens on Android, which are stored in the gallery, in a separate folder.
Take a screenshot of a website in Windows 10
Make use of the key Print Screen It is a simple and very useful solution when you want to capture essentially what you can see on the monitor. But what happens when you want to save an image from a website? If you want to capture what a website looks like, you have two options: portray the area that is visible on the website or capture the entire web page.
For the first thing, just use Print Screen. If you want to capture the entire website, then you will have to use another technique. Natively, Windows 10 does not have any tools that allow you to do this.
On this occasion, third-party tools will have to be used to perform this action. Fortunately, there are a large number of options available, all in the form of browser extension. Therefore, all you have to do is download one of these extensions for the browser you usually use.
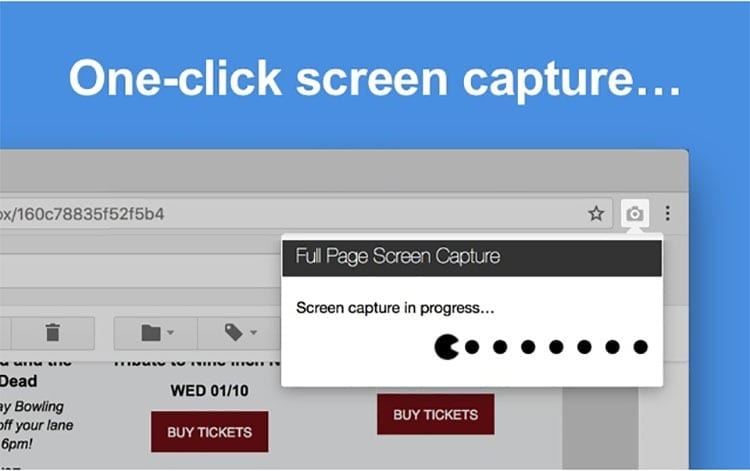
For example, for Mozilla Firefox one of the best options is PDF Manage, which allows you to make an image from the web and save it in PDF or PNG format. In the case of Google Chrome you can find Full page Screen Capture, among many other very interesting options. Opera has a tool natively to capture sections of a website, but if you want to do it with the entire site then it is best to use Nimbus Screen Capture.

All these tools have a similar operation. Simply click on the extension button and click on “Capture website”, selecting that you want to perform a complete capture. Some of the extensions will also allow you to edit the image, adding text or elements before being able to save it.
It is very important not to forget to save the image. In addition, you have to check where they are stored, as some extensions have a predefined location where they save the images instead of allowing you to choose the saving location.

I have been glued to a monitor since a PC fell into my hands in 1997. Now I like to write about everything related to them.
Content writer. Graphic Designer and Search Engine Optimization
 – Access to Wi-Fi settings")


