
When you are going to work on or present a project or idea, a simple and effective way to represent it is using a mental map. A diagram that helps represent the ideas or concepts of the topic in a simple way. Is a very useful tool when learning something new or presenting certain content so that it is easy to understand and memorize.
Many students use mind maps to learn quickly and easily. Thanks to the way the information is displayed, it is very easy to learn what appears in them.
Not everyone knows how to make a mental map, and it is a tool that is available to everyone. You simply have to know how to distribute information visually so that it can be studied without difficulties. Today you will learn how to make a mind map in Word, the most famous word processor in the world and which is installed on practically any computer.
Article Content
Characteristics of a mind map
Before starting to perform the mind map in word it is important to know the characteristics of a mind map. In this way, its development is facilitated, being clear about how it should be composed.
- The main theme is represented with an image placed right in the center of the diagram.
- Its structure is radial, that is, it is composed of nodes connected to each other.
- From the main theme, placed in the center of the diagram, other branches emerge in which the other concepts are placed.
- Concepts and ideas connected to the main theme are placed with keywords. In this way, the mental map is avoided being loaded with content and what is strictly necessary is used.
- The further a block is from the center of the diagram, the less important it will be.
How to make a mind map in Word
Taking into account the characteristics of the mind map, you are ready to start designing your own mind map in word. Open the program and get ready to create a map in which all the ideas will be captured in a concise way.
Optionally, the first thing we are going to do is edit the format of the document to eliminate the excessive margins that Word places. To do this, in the “Format” tab, we are going to click on “Page setup» (to access all the options you have to press the small square with an arrow, next to the line that separates the sections).
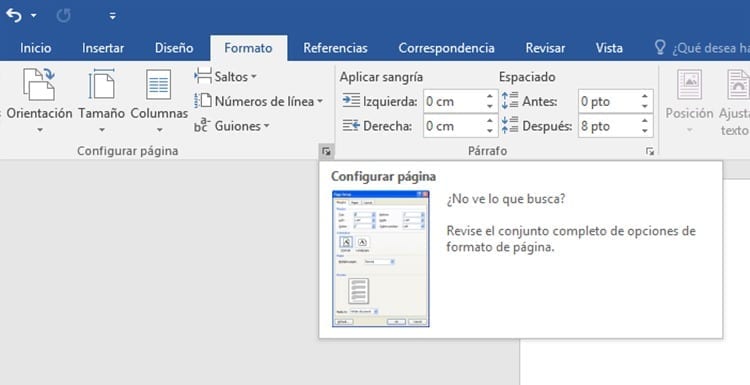
In the page settings we will go to the margins tab and there we will place the margins at a more appropriate size.
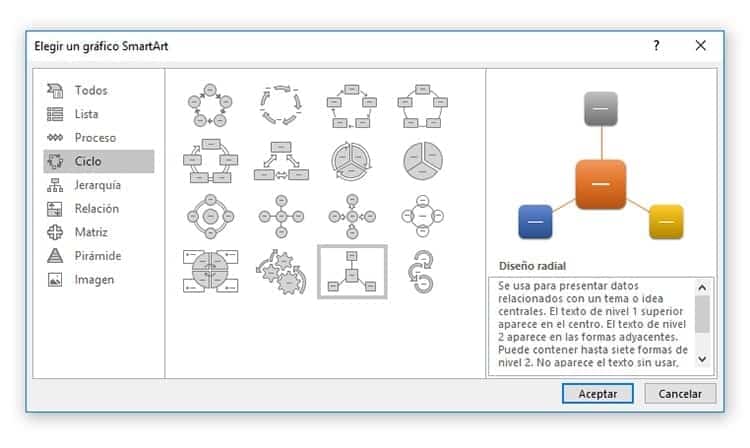
For start with mind map we will have to go to the tab Insert. Word itself has a feature that makes things much easier for us to create a mind map. We will have to click on the icon SmartArt (a green arrow with a white rectangle above it) to be able to insert a SmartArt graphic.
When you click on the SmartArt option, a new window will appear. In the list we will have to go to "Cycle" and there click on the last option: radial design. Finally, you must press "Accept" so that the graph is generated.
Adding information to the mind map
When the mental map is created we will find a box to the left of it in which we can edit the segments and add more information to the diagram.
Before starting to edit the diagram, we will have to click on it and 'place' it in front of the text making use of the option that can be seen in the image above. This way we can freely move the mind map around the document, as well as edit its size without any problem. Once this is done, we can begin to add the information that we want the diagram to contain.
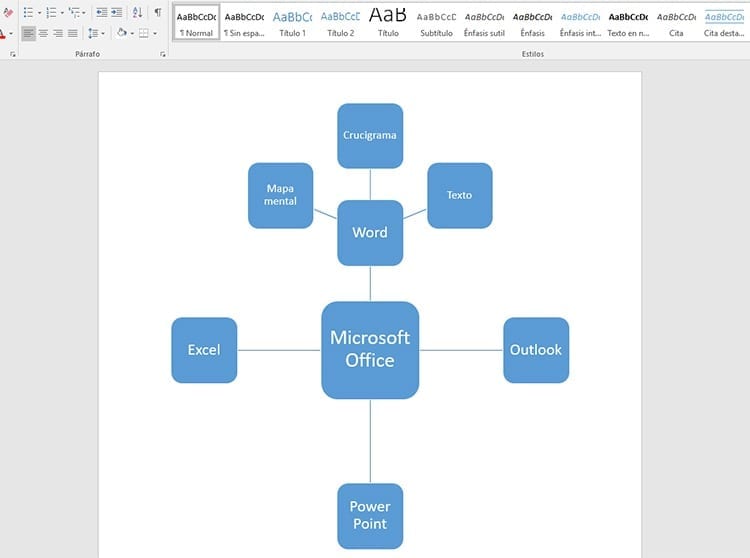
The first text box is for the initial idea. There we will place the main theme and then we will add information to create the different branches of the diagram.
When editing a section of the diagram, adding a new branch or editing an existing one, if we press the "Enter" key we will create a new branch. It is possible that we do not want that branch to be at the same level as the previous one. In this case we can take it to a deeper level by pressing the "Tab" key, that is, tabulation. In this way you will see how said branch descends one level in the diagram.
In the event that we want to create another branch at a higher level than the one we are in, we will simply click intro, to create a new one, and we will use the «Back» key to go up levels in the mental map.
There will come a time when, despite creating new levels, the new branches will not appear as new elements, but rather They will be created as sub-items within a branch and they will appear in the form of a list. For this reason, the number of elements that make up the diagram and its size must be taken into account.
Change the layout of the mind map in Word
When we have finished adding and editing information in the diagram we can proceed to modify its appearance. A more striking design, classifying branches by color and with a friendlier appearance can facilitate learning the mind map.
In Word we find many ways to edit images and documents like these. There are many options in the program capable of editing them, especially when it is a graph that has been generated with the same program.
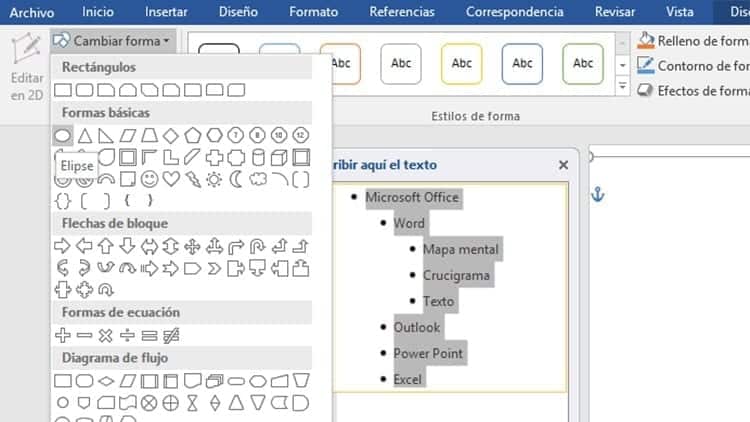
The first thing we are going to do is change the shape of the diagram. Instead of each section being inside a box, we're going to change the shape to a circle.
To change the shape of the diagram, we are going to select all the created content and in the "Format" tab let's head to «Change shape» and we will choose the circle. We can make use of any way listed there to automatically change the appearance of each section.
Now for add colors to the diagram We find two different ways of doing it. We can choose the color for each of the sections manually, choosing each of the circles and clicking, in the "Format" tab, the option shape fill and choosing the colors to our liking.
Another way to modify the colors, as well as the appearance of the mind map that we have created in Word, is to change its design. To do this we can go to the "Design" tab and click on the option Change colors. There we will find different default options, with colors and gradients that will make the mental map more striking.
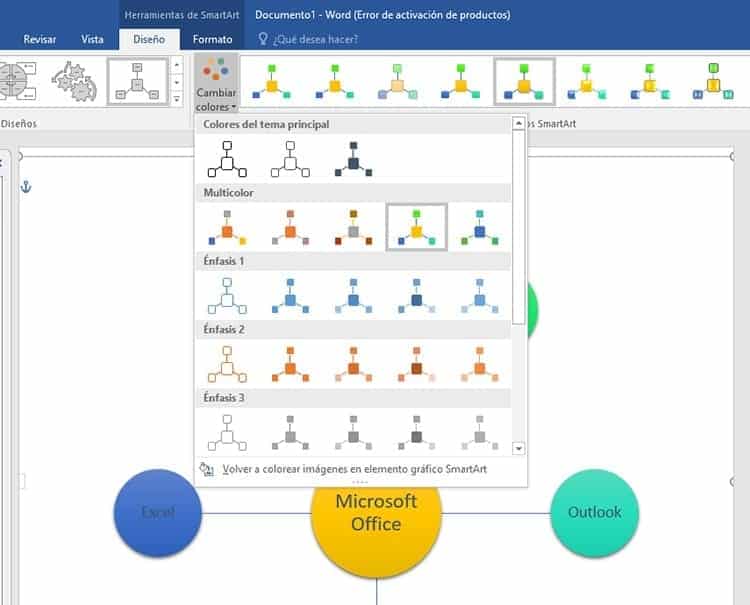
If we go to the section closest to the right of this feature we find the SmartArt styles, an option that allows us to change the appearance of our mental map, being able to choose between more "flat" styles and others with striking three-dimensional effects.
In addition to the preset effects in this tab, we can add effects manually in the "Format" tab with the option Shape effects in which we can find many effects applicable to the shapes of the mental map. Among them we can find shadows, bevels, lights, reflections and even 3D movements.
When we have finished editing the design of the mind map we can proceed to save it, going to File – Save As to save everything we have done and be able to open it later when we need to use it to study the entire content of the diagram.
FAQs
What is a mind map for?
It is used to make ideas, notes and all types of information clearer and more organized.
What is a mental map?
It is a diagram that is used to represent words, ideas, brainstorming, drawings and concepts that are linked to each other.
What steps must be followed to create a mind map in Word?
You must access the insert tab of the concept map, Click on SmartArt and choose the radial design. This creates the skeleton of the mental map, which you must develop by introducing your own ideas.

I have been glued to a monitor since a PC fell into my hands in 1997. Now I like to write about everything related to them.
Content writer. Graphic Designer and Search Engine Optimization
 – Access to Wi-Fi settings")


