
How important is it update java? It is a necessary process that we must carry out with the necessary regularity, depending on the new updates that the developer releases. We are going to know the reasons why we should carry them out, plus we will learn a lot of interesting things such as how to solve problems with Java, find out what version we have installed, we will learn how to install and update the program, and even how to uninstall it in case of that is necessary.
Article Content
The importance of updating Java
First of all, it is essential that we take into account the importance of updating Java, and we are talking about a program that, although little by little it is being left aside, continues to be used by a multitude of platforms and systems, as for example occurs in the case of JDownloader 2, one of the best download managers that we can use today.
In fact, for many it can end up becoming a problem in finding, too frequently, new updates to carry out, and although in recent months this frequency has decreased, it is still significantly higher than the average for other programs.
Therefore, it is very important that we know that, although it may be somewhat tedious, we must always keep Java updated, since it is a tool that on the one hand can be essential for many cases, while on the other, it is also a important vulnerability for our systems.
That is, the hackers They frequently use Java to cause infections.
In fact, most Java updates are precisely focused on improving security, as well as plugging the holes that are discovered and where criminals can enter.
And of course, some of them also serve to improve their performance, so, in short, it is very important that we carry out the java update with the regularity that is requested of us.
Where is the Java control panel located?
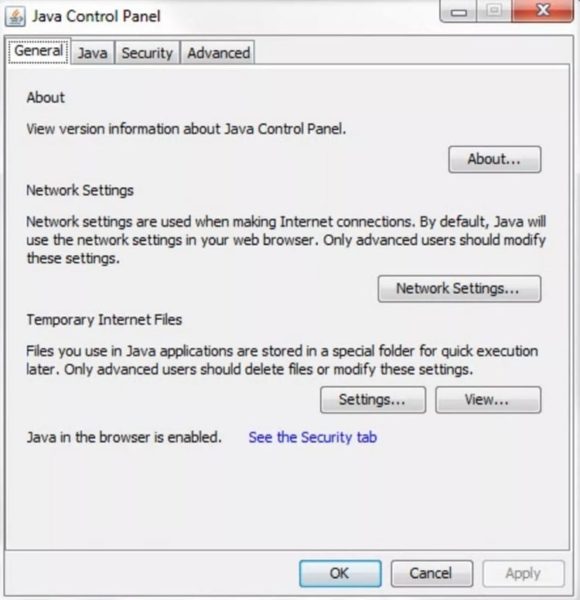
We must keep in mind that, depending on the processes that we are going to carry out, it is important in many of them that we be able to access the Java control panel.
For that reason, below we are going to explain how to do it for each of the different operating systems and their versions:
Where is the Java control panel in Windows
It must be taken into account that the way to access the Java control panel in Windows will depend on the version of Java that we have installed (before or after 7.40), so we will be able to find both possibilities. following:
Enter the Java panel in versions before 7.40
If we are using a version prior to Java 7.40, we must follow the steps detailed below:
- If we use Windows XP: We click on Start and access the Control Panel. We double click on the Java icon.
- If we use Windows Vista: We click on Start and access the Control Panel. In the search box we write “java control panel”. We click on the Java icon.
- If we use Windows 7: We click on Start and access the Control Panel. In the search box we write “java control panel”. We double click on the Java icon.
- If we use Windows 8: We press the Windows + R key combination and in the search box we write “java control panel”. We click on the Java icon.
- If we use Windows 10: We right-click on the Start button and enter the Windows Control Panel, where we select “Programs”. We click on the Java icon.
Enter the Java panel from version 7.40 onwards
If we have Java version 7.40 or later installed, the steps will be the same for all versions of Windows, and will correspond to the following:
- We enter the Windows Start menu.
- We go to the Programs section, except in the case of Windows 10 when we have to click on All applications.
- Of the programs that appear, we look for Java.
- We click on the option “Configure Java” which will open the Java control panel.
Where is the Java Control Panel on Mac
To access the Java control panel on Mac, we are going to follow the following steps:
- We go to the upper left corner of the monitor and click on the Apple icon.
- We select “System preferences".
- We click on the Java icon and we will enter the control panel.
How to check what version of Java I have installed
Depending on each case, we may find that we have several versions of Java installed on the same computer.
Regardless of this, it is important that we take into account the version or versions of Java that we have available, and for this there are different ways to check it:
Check the Java version on Windows
If we use the Windows operating system, we will have different ways to check the version we have installed depending on the version of Windows we are using.
- Check Java version on Windows XP: We enter the Start menu and then select the Control Panel. We click on “Add or Remove Programs” and we look for the Java version.
- Check the Java version in Windows Vista: we enter Start and go to the Control Panel. We access Programs and now we have to click on “Programs and Features”. We look for Java and we can check the available version.
- Check Java version in Windows 7: We click on Start and access the Control Panel. We enter Programs and click on “Programs and Features”. Here we can search for Java and find out the installed version.
- Check Java version in Windows 8: we click with the right mouse button in the lower left corner, and in the pop-up menu that appears we click on Control Panel. Inside we select Programs and then click on “Programs and Features”. Here we can search for Java and check the installed version.
- Check Java version in Windows 10: We enter the Start menu and access the applications section until we find the Java folder. We click on it and then on “About Java”.
- Check Java version from Windows XP to Windows 10: In a common way in all versions, we have the possibility of checking the Java version using the Windows key + R, and in the window that appears we write cmd. In the window that opens we write “java-version” (without the quotes) and it will indicate the installed version.
Check Java version on Linux
In the case of Linux, we will also be able to check the Java version with a few simple steps that are as follows:
- We open the Terminal.
- We write the following command: java -version
Check Java version on Mac
In the case of Macintosh, we can only have one version of Java installed, except in the case of the Java Development Kit, which allows us all the versions we want.
In order to check the Java Runtime version we must follow the steps detailed below:
- We enter a terminal window: we access the top bar and go to the Finder menu. We click on Applications and go to Utilities. Here we can open Terminal.
- We write the following command: /Library/Internet\ Plug-Ins/JavaAppletPlugin.plugin/Contents/Home/bin/java -version
If what we want to do is check the version of Java Development Kit, then we must follow the steps detailed below:
- We enter a terminal window: we access the top bar and go to the Finder menu. We click on Applications and go to Utilities. Here we can open Terminal.
- We write the following command: java -version
Where can I download the official version of Java

If we want to update the available version or we want to install Java on our computer, it is very important that we make sure that we are downloading the official version.
This means that we will only download through the Java and Oracle pages.
To make your task easier, below we offer you the links to download safely:
- Download the latest version of Java for Windows 32-bit.
- Download the latest version of Java for Windows 64-bit.
- Download the latest version of Java for Linux.
- Download the latest version of Java for Macintosh.
In any case, first of all we advise you to learn how the Java update is carried out, since depending on each need, we will need to download this official version or not.
Learn how to update Java

Next we are going to learn how to update the installed Java version.
To do this we have three possibilities depending on whether we are going to update Java on Windows, Linux or Mac.
Update Java on Windows
First of all, we are going to learn how to update Java in the different versions of the Windows operating system.
Learn how to update Java in Windows 7
- We access the Java control panel in Windows 7, a process that we have explained a little earlier in this article.
- Let's go to the tab “Update” and at the bottom right we will click on “Update Now".
- The installer window will open, and we have to click on “Install and restart".
- We restart the computer.
Learn how to update Java in Windows 8
- We access the Java control panel in Windows 8, a process that we have explained a little earlier in this article.
- Let's go to the tab “Update” and at the bottom right we will click on “Update Now".
- We click on "install update".
- The installer window will open, and we have to click on “Install and restart".
- We restart the computer.
Learn how to update Java in Windows 10
- We access the Java control panel in Windows 10, a process that we have explained a little earlier in this article.
- We click on the button “Update Now".
- We restart the computer.
Update Java on Linux
If you have the Linux operating system installed, below we will learn the steps to follow to update Java.
On this occasion we remind you that we are going to have to download the program file, and during the installation, as we are going to have to execute commands, let us remember that we will have to adapt the command to the version that we are installing.
For example, the text for Java version 8.79 will be 8u79, while if in our case we are going to install a different version, we will have to substitute the numbers, for version 8.76 it will be 8u76, for version 8.80 it will be 8u80 and so on.
- We download the latest version of Java for Linux.
- Once we have the file we have to become the root user, for which we will execute the command “su” and we will enter the password.
- We change to the directory in which we want to carry out the installation, so we will have to use a command like “cd directory_path_path_name", which will generally be "cd /usr/java".
- It is important that we install all the previous Java packages, through the command “rpm -e package_name".
- We proceed to install the package that we have downloaded with the command “rpm -ivh jre-8u76-linux-x64.rpm” (remember to change 8u76 to the corresponding version).
- In the event that we only want to update a package, we will use the command “rpm -Uvh jre-8u76-linux-x64.rpm” (remember to change 8u76 to the corresponding version).
- Once the process is finished, we will have the latest version of Java for Linux installed. Remember that the file you had downloaded for installation can be deleted without problem.
In this case it will not be necessary to restart the computer, since it will be activated and can begin to be used from the moment the installation finishes.
Update Java on Mac
For those of you who use a Macintosh, we are going to explain how you can update Java.
- We access the Java control panel on Mac, a process that we have explained a little earlier in this article.
- We click on "Update” and will look for new updates.
- If there are any, we have to click on “OK".
- The installation will begin, and once it is finished it will notify us.
As with the installation of Java for Linux, Java for Macintosh does not require restarting the computer, since when the installation is completed, this latest version is automatically activated.
Troubleshoot Java

On some occasions, problems occur with Java, either when carrying out the update, or even during its use.
Whatever the problem you have observed, below we are going to learn about the main solutions that we have at our disposal.
Error 1603. Java update has not completed
As we said at the beginning of the article, we very frequently have to carry out Java updates.
This can be slightly annoying, but it becomes even unpleasant when we find that the update does not complete.
If it is the case that you get Error 1603, keep in mind that not even the developer can tell us the reason why it occurs, since they are still investigating.
However, there is the possibility of bypassing this error by taking the steps that we are going to detail below:
- When the error appears, we restart the computer.
- We download the offline installation of Java.
- We run the installation file to start the process.
In the event that this has not resolved the problem and the message continues to appear, we will continue with the points detailed below:
- We enter the Windows Start menu and click on Programs or All Applications.
- We look for Java in the list.
- We click on "Configure Java” which will launch the Java control panel.
- Now we click on Security.
- We uncheck the option “Activate Java content in the browser".
- We apply the changes and accept.
- We reinstall Java using the offline installer that we linked to before.
- We return again to the Java control panel and the Security section.
- We mark the option “Activate Java content in the browser".
In principle, with these steps it should have been solved, and the installation should have completed correctly.
However, there is a possibility that it will still give us the same error, in which case what we are going to do is uninstall the versions of Java that are installed on our computer to install the latest clean version.
To do this we are going to jump to the section “How to uninstall Java” which you can find at the end of this article, since it is the place where we explain the process for each of the operating systems and versions that we have installed.
Once we have uninstalled Java, we proceed to continue with the points detailed below:
- We reboot the system.
- We perform the offline installation of Java to which we have linked a little above.
In this way, we will have already installed a completely clean copy, so that no new errors have been registered if we follow the process as we have indicated.
Tips for resolving Java upgrade and usage issues
The error that we have mentioned before is one of the most common that we can encounter.
However, this does not mean that there are also many others that we should take into account.
That is the reason why we are going to detail a series of recommendations to be able to solve Java problems both in installation and in its use.
Java download and installation issues
We start with the problems that may arise when downloading and installing Java.
In the event that they occur and it is not error 1603, which we explained the process to solve a little above, then we will have to try the following solutions:
- We tried to install the Java offline package.
- Disable the antivirus and firewall temporarily, install the offline package and activate them again.
- We uninstall the Java installations that are installed on our computer (to do this we follow the steps in the section “How to uninstall Java” which you will find in this same tutorial a little later).
- We install the clean Java offline package.
Java usage problems
There is also the possibility that we may encounter problems derived from the use of Java, in which case we are going to try the different solutions that we propose below:
- Activate the new version of Java- Restart the browser to activate the new version of Java you have installed.
- Browser permissions for Java: If the browser asks for permission to use Java, we must grant it.
- Check that Java is activated in the browser we are using: Generally we will find this in the Security section of our browser.
- Check that Java is enabled in the Java Control Panel: In this case, all we have to do is access the control panel to check that the program is actually activated.
- Find out Java security level: Sometimes, if we have a very high security level, some applications cannot be run with Java. What we will do is access the Java control panel and manage the security level through the “tabSecurity".
How to uninstall Java

Next we are going to learn how to uninstall Java depending on the version and operating system that we have installed.
Uninstall Java on Windows XP
To uninstall Java in Windows XP, we have to follow the steps detailed below:
- We click on the Start menu.
- We access the Control Panel.
- We came in "Add or Remove Programs".
- We select the Java software that we want to uninstall and click on the button “Delete".
Uninstall Java in Windows Vista
Below we explain the steps that we must carry out to uninstall Java in Windows Vista:
- We click on the Start menu.
- We access the Control Panel.
- We enter Programs.
- We click on "Programs and Features".
- We select the Java software that we want to uninstall and click on the button “uninstall".
Uninstall Java on Windows 7
If we want to uninstall Java in Windows 7, below we detail the steps to follow:
- We click on the Start menu.
- We access the Control Panel.
- We enter Programs.
- We click on "Programs and Features".
- We select the Java software that we want to uninstall and click on the button “uninstall".
Uninstall Java on Windows 8
In order to uninstall Java in Windows 8, we will follow the following steps:
- We go to the search box and enter “Control panel".
- We select the Control Panel.
- We select the option “Uninstall a program".
- We select the Java software we want to uninstall, right-click and select “uninstall".
- Confirm that we want to uninstall the program.
Uninstall Java on Windows 10
In the event that we have Windows 10 installed and we want to uninstall Java, below we indicate the entire process to follow:
- We click on the Start menu.
- We enter Settings.
- Here we select System.
- We click on “Applications and functions”.
- We select the Java software that we want to uninstall and click on the button “uninstall".
Industrial Engineering student and lover of writing and technology, for several years I have participated in various pages with the aim of always keeping myself informed of the latest trends and contributing my grain of sand in this immense dissemination network that we know as the Internet.


